How to Install Exhaust Tip in 4 Steps
- 30 Sep, 2022
The exhaust tip may completely alter the design of your car, much like how a cherry on top makes a cake look gorgeous. And that's not just how it looks. Your car is additionally shielded from carbon monoxide and excessive noise by an exhaust tip.
The majority of the time, motorists appear less bothered about an exhaust tip since they believe it to be only a cosmetic improvement. But because I'm a picky vehicle enthusiast and can't help but notice aesthetics, fitting an exhaust tip is my first priority.
Due to the misconception that installation is a nightmare, people disregard exhaust tips. They are correct. But that's not quite accurate. An exhaust tip may be installed quickly and easily.
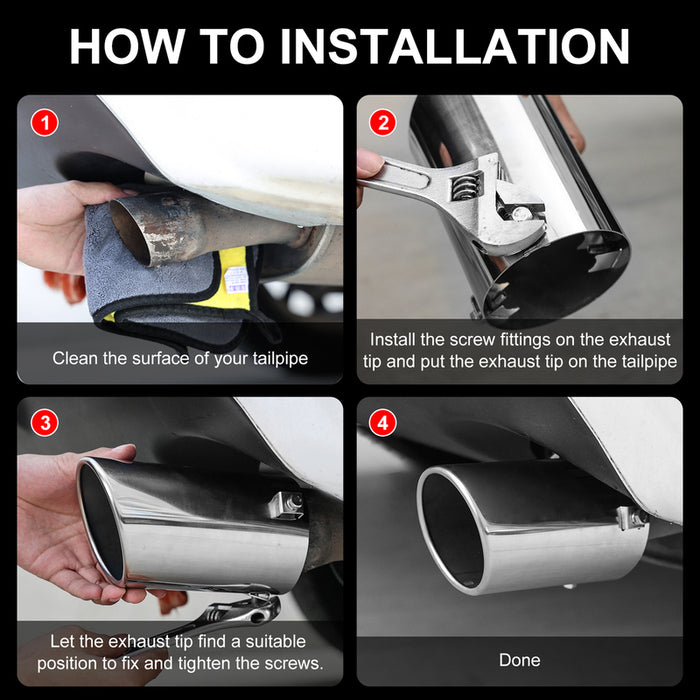
So, I’m going to give you a simple guide on how to install exhaust tips.

1. Cleaning the Tailpipe
To avoid any resistance, clean the tailpipe thoroughly before starting so your new exhaust tip can easily slide onto it. Also, do not start the installation when the pipe is hot.
2. Disassemble the Exhaust Clamps
Before you slide the tip over the exhaust pipe, loosen all the clamps and take the hex nuts from the bolt. This step involves adjusting the tip to fit your car's exhaust and checking to see if it fits properly or not.
One of my customers thought a bigger tip would make the car roar when they brought it into my garage to install. He eventually had to make a cut in his bumper to allow the exhaust tip to fit.
Here, you can simply adjust it a little and hear the difference; you don't need a bigger tip for a louder exhaust sound. However, because a larger room provides more space, a huge tip can actually make a louder sound.
3. Slide The Tip onto The Tailpipe
Next, attach the exhaust tip to the pipe connection, and then begin to attach the hex nuts one at a time. You simply need to check to see if it fits properly at this point.
Start tightening the connections once the tip and pipe are securely in place. If you don't have a socket that fits the hex nuts, it won't adjust correctly.
In that situation, having a range of options is preferable, hence I favor using EP Auto Drive Socket Set. You may find the socket of the right size here for your hex nuts.
4. Tighten Bolts and Nuts
If you are holding the correct size socket, fasten it to the ratchet and begin tightening all of the hex nuts.
Try taking out the exhaust tip to test whether you've done it correctly; if it doesn't seem to have loosened, you're ready to go.
Conclusion
A car's exhaust tip is necessary for improved combustion, and removing one might result in an exceptionally loud noise that is prohibited in many nations.
So, clamping is always preferable than welding if you want a simple method. Because you can complete this task by yourself with a few simple instruments, it is simple and affordable.
For instance, I enjoy occasionally changing the exhaust tip on my car to give it a more upscale appearance when it rusts and discolors. I never had to rely on a welder to install my exhaust tip, which is the nicest part.
I trust you have all the knowledge you require to successfully install an exhaust tip without welding. So, get your car ready for the next ride.


